Showing posts with label Ranger. Show all posts

Monday, July 21, 2014

Live, Laugh, Love Layout with Melissa

Melissa here with more vintage obsessions.  
Today’s fixation is the vintage photobooth pictures combined with the amazing Tim Holtz die cuts and papers by Authentique and Echo Park.   The pictures along with the  'live laugh love' block from the Echo Park set made me wonder about their lives and from the ones I chose, it looks like they were able to display each value.


Everyone knows I love the clock die cut, but the new "Trellis" may just be in the running for the favorite!  I already have a ziplock to hold all the middle inserts because it is way too much fun to mix and match. 
It is a pretty simple layout and the longest part was trying to decide which photos to use (some from my stash and some from my friend the internet and some from my friend Tumblefish Studio).  
No real in depth techniques other than trying to decide which colors of ink ( Peeled Paint, Tea Dye, Stazon and Saffron).   Yes, mentally I sent a note to Wendy Vecchi thanking her for the Saffron Archival ink.  The second time consumer was trying to decide which swirls, stamps, etc -- once all that was done, just glue it all down.   The store has the most amazing selection of backgrounds, swirls, and 'messy' stamps... go have a look and tell them I sent ya ;)
… and doodling, nothing beats the Signo white pen and my most wonderful husband went out in the rain to pick up new pens for me when my last 2 ran out (he was on his way to the post office so I thought it wouldn’t hurt to ask).   Before adding the squiggle lines (yes, it is a technical term) and the dots, well, the pictures just looked like I was just trying to shove my favorite photo booth picts on a page (which I was, but still wanted it to be visually appealing).   Give it a shot!
My other new fav are the Maya Road wooden accents covered with Distress Stain and then traced with Icicle Stickles.  (I had butterflies, but I think I may need to strip off the trial layers of paint and use for another layout… whoops).  Then I can't tell you how much I played around with arranging the flowers - thought about making some with the papers, but sometimes, the store bought flowers are JUST what is needed.
Anyhoo – Thanks for looking and hopefully this has lit the light of inspiration.  Until next time.  

Friday, July 11, 2014

Zentangle Layout with Melissa

Hey Melissa here with yet another fun layout -- well at least I thought it was fun -HA!

When I opened the kit and found the Crate Paper 'Boys Rule' set, I must have been in some sort of obstinate mood.   First thought was, 'no they don't'   and then 'I really do not want to go find pictures from 10 years ago to fit the paper'.     So out of the box I go!   Surprise!


Zentangle is all the rage right now and I have a wonderful set of images with the dresses zentangled from Hidden Vintage Studio at Deviant Scrap.... and this sweet little girl was screaming to be used - how could I refuse!

I started with the most solid sheet I had and grabbed the Tim Holtz Bubble stencil and Dina Wakely's most fab glorious paint (Turquoise and Lime).   Dina's new big ole paint brush is GREAT to use for stenciling (make sure it is a dry brush).   Then used Festive Berries Distress paint with the Crafter's Workshop text stencil.  


The swirls are some set of stamps that are 100 years old, but I am sure you have swirls in your stash if you wish to do something similar.  Then added some sequins and silver stars to finish off the 'scattered' look.   The edges of each of the papers have turquoise pan pastels around the edges to tie all the papers together. 


Last bit was the Tim Holtz rosette die cut (really do not think you can EVER have too many die cuts) and the scallop boarder.   The paper line has a multi color stripe page and I just free hand cut the border and added doodles to kick up the fun factor!


Hope you enjoy the page!   Let me know whatcha think
Melissa

Monday, June 23, 2014

Leaky Shed Studio with Anita H

For the next couple of weeks, we will all be highlighting some fabulous chipboard pieces from 
The Crafty Scrapper started stocking these amazing products a few months ago, so be sure
 to look for them when you stop by!


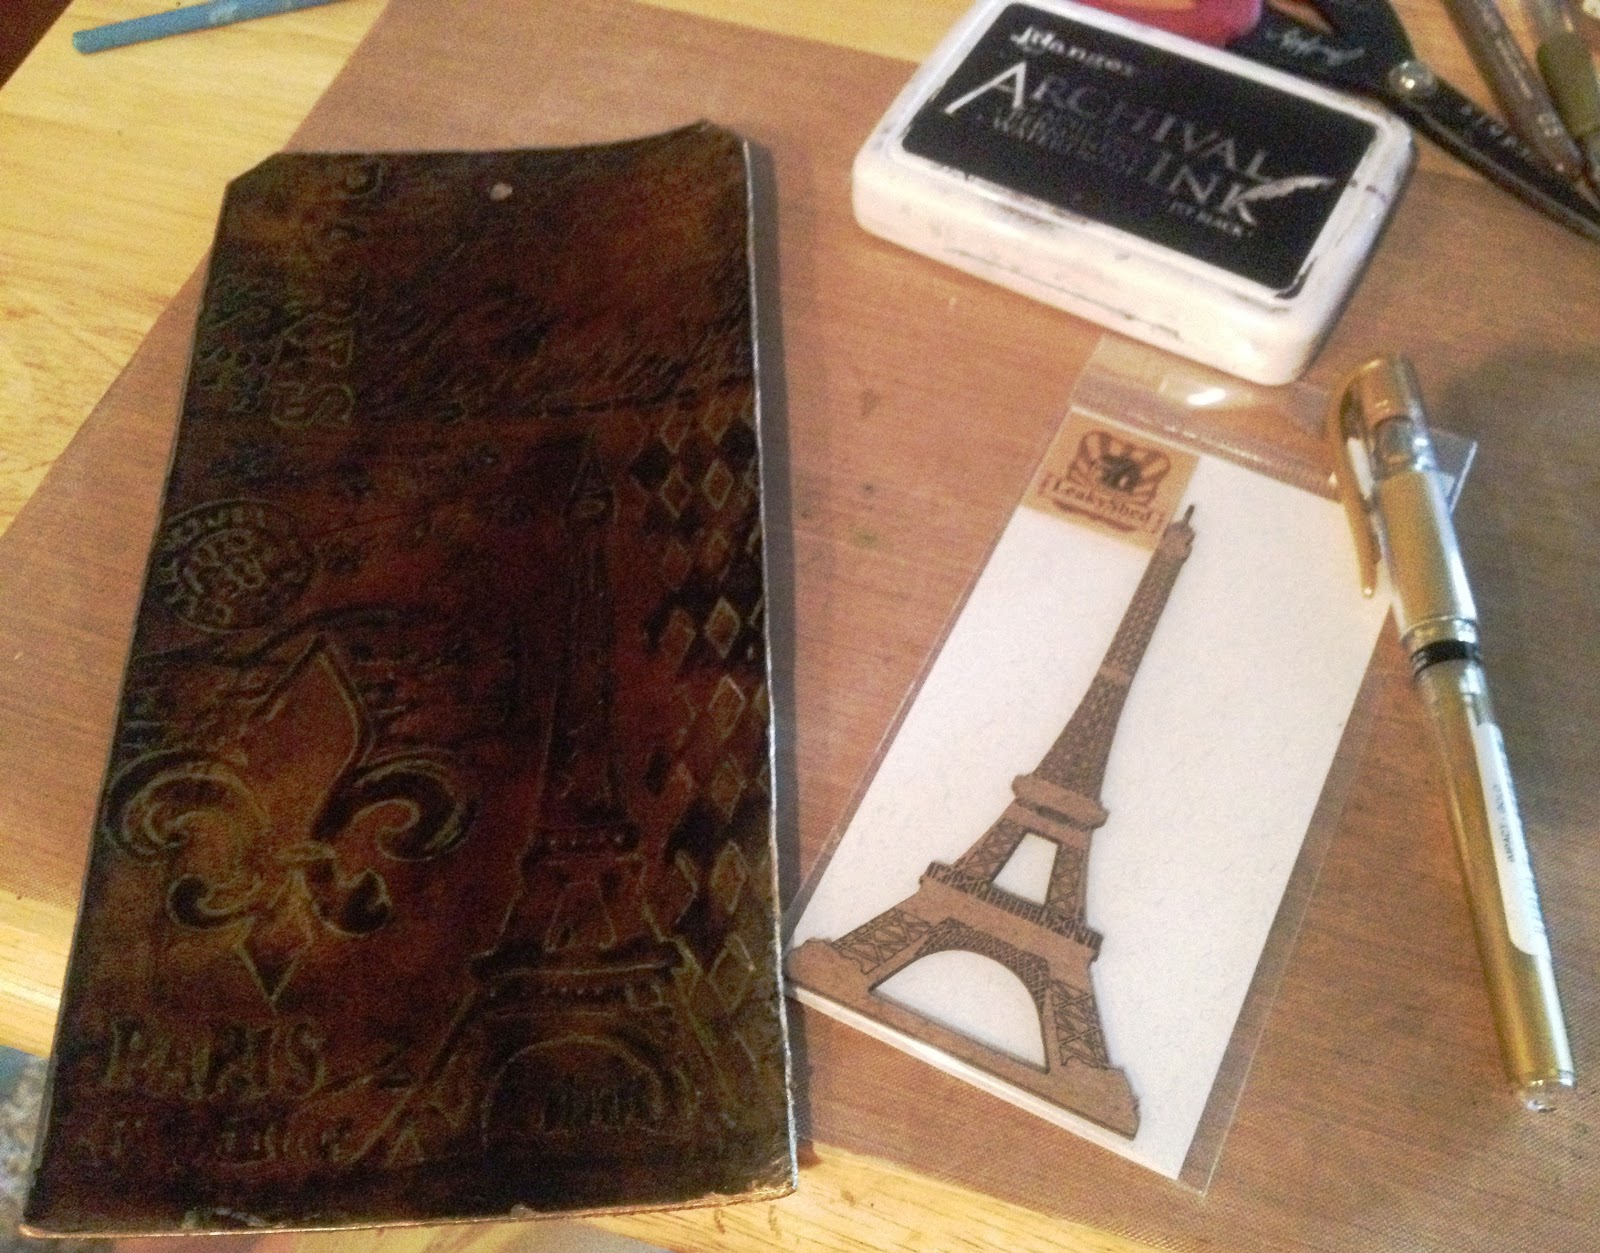
Hello Crafty Scrappers!!! Anita Houston of the Artful Maven Haven, to show you an awesome shaped piece of chipboard from Leaky Shed Studio. The company was generous to give each of the Design Team Members at The Crafty Scrapper, our choice of pieces, and I chose the Eiffel Tower. I love the sturdiness of it, and would love a much larger one...hint hint!!!
I was stumped for a base for this though, and after rummaging through a new bag of stash from The Crafty Scrapper, I found a package of Ten Seconds Studio's new Emboss-able Leather! Words cannot express how much I LOVE THIS STUFF!!! Leather might be my new go to base! Oh the possibilities!!!

 I cut an 8.5x4 inch piece of the leather, and trimmed it up into a jumbo sized #10 tag. I ran it through the Cuttlebug using the A and B plates, and Tim Holtz Sizzex Texture Fades, as it was too thick to go through my Vagabond. It embossed like butter! I love that the Eiffel Tower on the Texture Fade fits the Leaky Shed tower wonderfully. 
          
 Part of the leather collection from Ten Seconds Studio is the Cattle-ist Stains to color the leather. I LOVE them too! I used all three colors to stain my leather tag, using a soft moist cloth. Then I used the Glaze over the stain! EASY! 

 I wanted a little more definition of my embossed images, so I rubbed the pad of Ranger's Jet Black Archival directly over the tag to highlight the images, and then traced in some of the deeper impressions with a Uniball gold gel pen! LOVE!!! I added the Leaky Shed Eiffel Tower, and the tag really came to life! Then a few Prima Flowers (Colored with the Cattle-ist Stain and Gold Paint Dabber), and lots of Maya Road Metal Embellishments and Lace (Colored with the Cattle-ist Stain) finished the tag off.


If you want to see more close up photos, click on over to my blog. Thanks and have a great creative day!!!

To see this project and a list of supplies, be sure to stop by the store!

Don't forget, you have a few more days to link up your project for this months blog challenge!
We have a great prize up for grabs- so be sure to join in the fun.
Check out all the details HERE.


Tuesday, May 20, 2014

Wendy Vecchi 2-Day Workshop

We are all so excited to have Wendy back to the store. She is an amazing teacher, teaching you techniques that will amaze you.  Wendy taught at my store years ago before she had her stamp line and signature line with Ranger, I knew then that this lady was going places.  

A little about Wendy.........

Wendy Vecchi is a full time artist/designer and owner of studio 490.
She is a signature designer for Ranger, Stampers Anonymous and Blossom Bucket, Senior Educator for Ranger, and a past member the Tim Holtz and Maya Road design teams.  
Wendy loves to demo and teach at stores and events across the country and has been published in numerous publications. She was the guest instructor for the Artful Voyage in Mexico with Tim Holtz, in October of 2009. 
 Her style is unique and eclectic with an exceptional attention to detail and a fresh approach to the creative spirit. She shares her love of techniques on her blog and reminds you that whatever you do each day just – "Make Art!".
 
You can find more inspiration on her blog at www.studio490art.blogspot.com and on the Ranger website at www.rangerink.com
 
Let's mix media and MAKE ART!
2 Day Workshop $225
Includes lunch both days ( 1hr. break)
Sunday & Monday 9:30am ~ 6:30pm
June 8th & 9th

Sneak Peek at the Covers of the Art Journal......
 
A Sneak Peek at the pages in the Art Journal......
   
   Come join us and spend 2 full days focusing on mixed media and art journaling. We'll be creating a large art journal. YES...it's LARGE... 9 inches by 7 inches. We'll start by creating the journal covers using my art parts, archival inks and embossing pastes. When the covers are complete, we'll work on our art journal pages. Each page will have a technique as it's focus. 
 
Since it's a mixed media weekend, we'll be using lots of fun supplies like embossing pastes, archival inks & reinkers, distress inks & stains, remnant rubs, idea-ology and much more.
 
You'll learn new techniques and how to use your products more than one way.
 
I'll provide plenty of choices for stamps, stencils and ink colors, so that you can customize the journal and make it totally YOURS.
 
We'll ink, stamp, stain, emboss, collage, stencil and...MAKE ART!
 
Please bring only these 4 items...
craft sheet, ink blending tools & replacement foams, wet paper adhesive, and scissors. 
 
I'll supply the rest.
 
I CAN NOT WAIT to make art! I hope to see you there!
 
~ Wendy Vecchi


FOR QUESTIONS OR SIGN-UPS CALL THE STORE 972-923-3151
OR EMAIL

carolyn@thecraftyscrapper.com for Carolyn
gena@thecraftyscrapper.com for Gena

Friday, April 25, 2014

Scribbley Birds with Anita Houston- Dina Wakley Class

Hello everyone! Anita Houston , The Artful Maven here today to share a project!
I was so fortunate to be able to take a Dina Wakley class at the Collins Show last month.
Dina will be at The Crafty Scrapper this weekend doing workshops, please stop by and say hi!


If you haven't gotten a chance to try her new line of products from Ranger, I suggest starting with these gorgeous Scribbly Birds stamps.


 I hope your hands get creatively dirty soon!
Anita Houston

Thursday, April 24, 2014

Birthday Bash Winners~!!!

Hi everyone- are you dying to know who the winners are 
from the Birthday Bash!! 

Here we go- all the winners and their prize,,,

Barbara Chaplin
Fiskars Border Punch 

Michelle Dickson
Inky Antics Stamp Set

Linda Johnson
Wendy Vecchi Embossing Paste & Stencil

Linda Childres
Fiskars Shape Punch

Melissa Reed
Ten Second Studio set

Anette Sharp
Ranger Inks and Paper

Cheryl Daking
Tim Holtz Paper Pad

Julie Vargas
Screen Printing Set

Tabitha Rutenberry
Authentique Paper Pads

Kim Varner
Dylusions Stamp Set

Our Grand Prize Winner is,,,,,,
 
Mary Sanders
A new Tote Bag and a $50 Gift Certificate for Classes!!

Please contact the store directly to claim your prize!

Thanks so much to everyone who came out and had a great day with us!
See you next year :o)


Thursday, April 17, 2014

Custom Colored Seam Binding

Hey guys! It's Gena and I just wanted to share a quick and easy technique that I LOVE to use with seam binding.

I'm sure you all know what an AMAZING selection of colors we have at The Crafty Scrapper, but just in case you haven't seen lately... look at the yummy colors!


There are times that you may not have the color you need or you need your ribbon to match one of Tim's distress inks you are using... let me show you a little trick! You will need a spray water bottle, ink and your craft mat.  To begin tap your ink pad on your craft mat and then spritz with water.


Run the ribbon thur the ink... repeat until you get the desired color!


Dry with a heat gun and BOOM you have your own custom ribbon.

Thanks for stopping by!  

Gena


Tuesday, April 08, 2014

Design Team Challenge with Patty

Hi Everyone! It's Patty again with my entry for The Crafty Scrapper Design Team challenge.

  This little mini album is a work of heart that I have wanted to create for quite some time, now.

The subject of the little album is the place in the country owned by my grandparents when I was a child. It was officially named "Echo Hills", but we just called it "The Farm". Although many homes and a school have sprouted up on the same land in the last forty years, I remember it as if it was yesterday. Now, I have a treasured little album to pass along to my children, so they will also have a chance to experience this little bit of Heaven on Earth. After all, what better reason for scrapbooking, than to pass our memories along to future generations?

I have always enjoyed interactive scrapbooking and this little envelope seemed perfect to list the variety of crops that Dandad grew in his garden.


These two photos are of my parents holding me, at less than a month old, then at about six months. They were both taken at the farm.
My grandfather was Sheriff of Tarrant County and later, the United States Marshal for The Northern District of Texas. Every year, there was a law enforcement picnic held at the farm and everyone would have a grand time, but I think that I enjoyed them the most!


There was  a lake, where we not only fished, but would throw sticks into the water for the dogs to retrieve during warm months.  There were several ponds at the farm, and I remember my grandmother and me catching fish there. It is one of my fondest memories of her. In the page on the right, is a photo of my horse, Diamond, and me. I was sixteen.


Be sure to stop by my blog to see more photos of this little album. I hope you will leave a comment there. Better yet, stop by The Crafty Scrapper and see it on display.


Saturday, April 05, 2014

Design Team Challenge with Gena

Hi everyone, are you enjoying your weekend?
It is perfect weather to stay inside and craft!!

Today we have another project in our Design Team Challenge
and today we are featuring Gena

Here is a look at her fabulous canvas,,
Gena used the Maya Road chippies to make a flower on her canvas.

Here is a look at all the dimension on her project- layers and layers of fun!


Gena used the pearl chain, the Basic Grey rhinestone sticker 
and the gemstone to make the center of the flower.

Ribbon, Maya Road mini tickets, burlap trim, and a clay heart finish off the project.

Be sure to stop by the store to take a look at Gena's fabulous canvas and pick
up some supplies to make something wonderful of your own!

Only one week left until the Birthday Bash!
Be sure to get your ticket for this fun event- it is such a 
great time every year,,, you don't want to miss it!

Thanks so much for stopping by today. 
Stop back by tomorrow to see another one of our designers
and her Design Team Challenge project!


Wednesday, April 02, 2014

Design Team Challenge- Anita S

Howdy everyone,, are you ready for the Birthday Bash? 
Have your bought your ticket yet?
There are still a few left- so hurry!


We are having a Design Team Challenge here at The Crafty Scrapper - everyone was given the same bag of supplies and had to create a project with it. I am so amazed at how talented these ladies are and the beautiful projects they turned it!! We will be featuring one of the DT members and their projects everyday from now until the Birthday Bash on April 12th. So be sure to come back and see them all!!

Here is a look at my project,,
I started with a piece I have had laying around the studio for some time- a fake decorative book.
All the pieces of chipboard that you see surrounding the flower were included in the challenge kit. I knew right away that I wanted to make a flower out of them. I simply bent them in shape, painted white, then sprayed with Ranger Perfect Pearls and Dylusions sprays. I used hot glue to hold everything in place. 
Of course the chipboard pieces are from May Road, as are the buttons, pearl chain, ribbons and tickets.
My center flower I picked up at the craft supply. I added the dragonfly, and pearls from the kit as well.
I added in some flowers and a paper doily from my stash.
I sprayed the chipboard with Dylusions and added accents with my white pen.
I love how the title came out- I added a glass slide under one of the words for some dimension.
I have had these flowers hanging around the studio since I bought them at convention I don't know how many years ago! I thought they were perfect for this project!
I painted each flower with Sparkle Modge Podge- who doesn't love that stuff! 
The gold tulle is from my stash as well. 
Be sure to stop by The Crafty Scrapper Blog everyday leading up to our
big Birthday Bash on April 12th- We will be featuring a project from one of our designers every day!
Thanks so much for stopping by today!
Have a great week!!